

Raspberry Pi Compute Module Development Kit
Compute Module 3+ Development Kit
The Compute Module 3+ Development Kit for developing industrial applications using CM3+, also compatible with CM3
Buy at present
Getting Started
Quick-get-go guide
Please read this quick-start guide advisedly before unpacking the boards from their anti-static bags or using the kit: it contains important information on how to avoid damage to the Compute Module and/or the CMIO Board.
Static sensitivity warning
Both the Compute Module and the CMIO board can be damaged by static electricity (electrostatic belch or ESD). Delight take acceptable precautions against static discharge during handling.
For a consummate listing of the contents of the development kit, please see the Specifications section.
Initial setup and checks
Inserting the Compute Module (CM) into the IO lath
First insert the CM at a 45-degree angle, so gently press down on both acme corners of the CM (where the holes are) until information technology clicks into place.
Checking IO bank voltage jumpers
Delight make sure that the ii jumpers that power the GPIO banking company 0 and 1 voltages are present on J3, and set to the voltage you wish to utilize. Practice non power upwards the board if these jumpers are not attached (and hence the GPIO bank(s) are unpowered), equally this may damage the Module.
Powering upwardly
Brand certain the CM is inserted correctly into the socket (J1). Brand sure the GPIO banks are powered (make sure J3 has jumpers present and set correctly). Attach a micro USB power supply to J2 (POWER IN) to power up the board.
Note that at this indicate the red power LED and light-green ACT LED should light up. Zippo further should happen (because the Compute Module Flash (eMMC) is blank).
Loading an Bone image and further documentation
The next step is to write an operating arrangement paradigm to the onboard eMMC Flash. In one case this is done, the lath should kick into the Bone of your pick when you power up.
Farther documentation, including a stride by step guide to flashing the eMMC, is available.
Specification
The Compute Module 3+ Development Kit is made for developing industrial applications with CM3+, CM3+/Lite, CM3, CM3 Lite, and CM1.
The Development Kit contains the critical hardware that allows you lot to design the Compute Module into a custom system, and gives you lot the liberty to add extra components and place parts exactly where your production needs them.
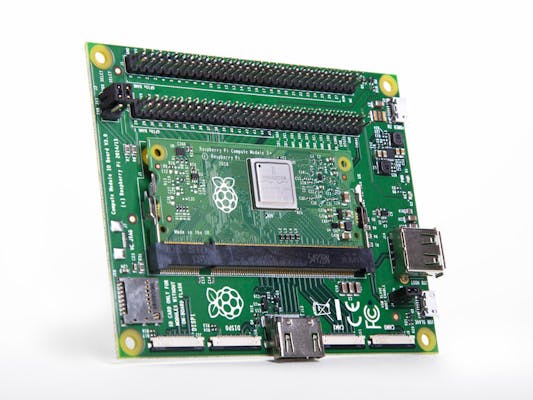
The kit includes the Compute Module IO (CMIO) board, which is a elementary, open-source breakout lath into which you lot tin plug a Compute Module. The board hosts 120 GPIO pins, an HDMI port, a USB port, two camera ports, and ii display ports.
The Development Kit contains the post-obit:
- ane × CMIO v3 breakout board
- 1 × CM3+/32GB Compute Module
- one × CM3+/Lite Compute Module
- one × CMCDA lath (breaks in one-half to ane × camera and i × display adapter)
- 2 × 22W, 0.5mm pitch, 50mm length small FFCs for the adapters
- 1 × USB B to USB A cablevision (for programming)
- 4 × pin header female-to-female person jumper leads (20cm), to allow connecting display and photographic camera I2C
Note: a separate power supply, such as the official Raspberry Pi Universal Power Supply, is required to power the product (not included in the kit).
The CM3+, CM3+/Calorie-free, CM3, CM3 Lite, and CM1 are available for purchase in single units, or in batches of hundreds or thousands.
Compliance
The Compute Module Development Kit has undergone extensive compliance testing, and meets the following European standards:
- Electromagnetic Compatibility Directive (EMC) 2014/30/EU
- Restriction of Hazardous Substances (RoHS) Directive 2011/65/EU
View and download global compliance certificates for Raspberry Pi products.
The Adopted Trademarks HDMI, HDMI High-Definition Multimedia Interface, and the HDMI Logo are trademarks or registered trademarks of HDMI Licensing Administrator, Inc. in the United States and other countries.

Buy Compute Module 3+ Development Kit
Source: https://www.raspberrypi.com/products/compute-module-development-kit-2/
Posted by: dumaisention.blogspot.com
0 Response to "Raspberry Pi Compute Module Development Kit"
Post a Comment