

How To Delete Templates In Sales Force
- View Larger Epitome

Salesforce was designed to make keeping track of relationships with your customers easier and more efficient. Just what about making professional and consistent communication with your customers easier? With Salesforce and Chargent, you tin create customized email templates that can exist automated.
Two Types of Email Templates
In this tutorial, you will be working with Salesforce Classic Email Templates and Salesforce Lightning Email Templates. Both of these are used in different situations.
Salesforce Classic Email Templates are currently used with Workflow or Procedure Builder to automate electronic mail alerts. The emails are sent automatically in one case triggered by a certain consequence, such as when a transaction is approved or an account is by due. When y'all're using the Chargent app, yous'll utilize this version when sending receipts, Payment Requests, and Automated Collection emails.
You can also use Salesforce Classic Email templates based on your blueprint to automate an email sent out 30 days before a renewal menstruation. Once y'all set upwards your email automation, you lot don't accept to track and email customers individually and find information from multiple records, as the organisation volition do that work for you. Yous can ready a timeline for automated emails through Workflow with a Archetype Email Template.
Salesforce Lightning Email Templates are currently used for communicating with your customers ane-on-one. This email system is non automated, meaning y'all tin't automate it. But you lot can create email templates to use when you are communicating with any of your customers. This is where the merge fields come in. With merge fields, you can customize the electronic mail design to comprise information unique to the customer.
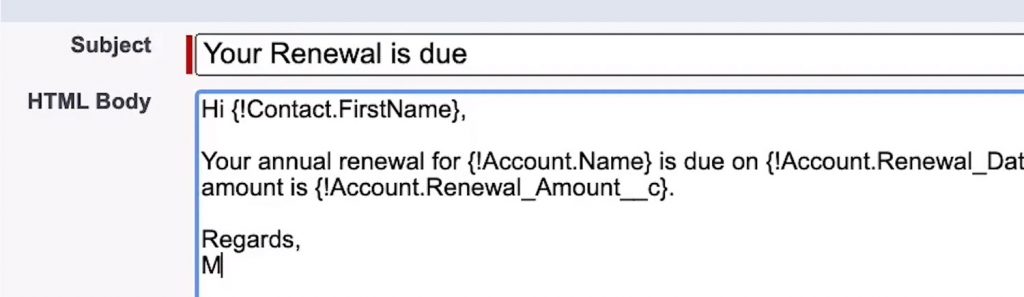
For instance, at Chargent we oft get questions from our customers regarding their upcoming account renewals. With Lightning Email Templates, you can set up custom fields that will determine a renewal date and the amount that their renewal costs. It's easy to create a custom template that populates the customer's name, business relationship, renewal date, and amount from their file.
Salesforce Classic Email Templates
How can you begin using this helpful tool today? Let's become through building templates for Salesforce emails step by pace.
Step 1: Create a New Template
Within Salesforce, navigate to your Setup. From there, you volition enter a search in Quick Find for "Classic Email Templates." Click the link, which will take yous to the e-mail templates page. You will see the option to create a new one either in the center or the correct-hand side of the page. Click the New Template button to begin.
Pace 2: Template Settings
Once you lot click the New Template button, you will meet you can create iv unlike types of electronic mail templates.
- Text
- HTML (using Classic Letterhead)
- Custom (without Archetype Letterhead)
- Visualforce
Each choice allows y'all to create a template. For instance, the HTML with Archetype Letterhead allows you to create a template and layout using your company's letterhead. We will explore the pick Custom (without Classic Letterhead) for this article. After selecting that option, you volition be brought to the side by side screen.
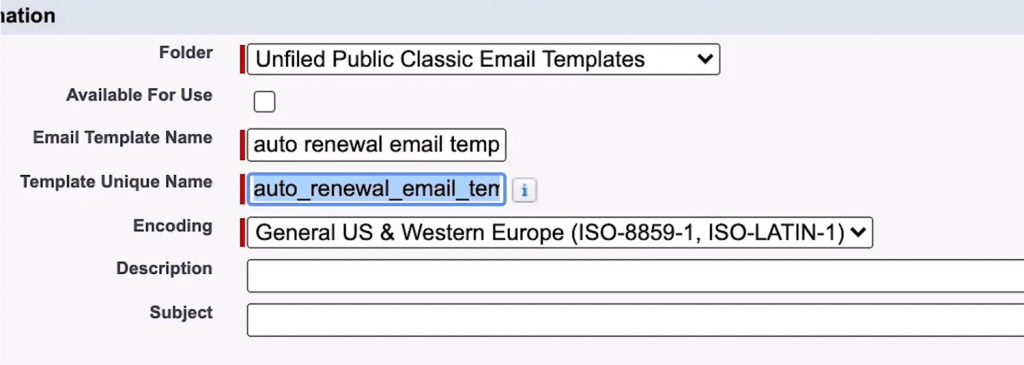
Y'all will need to name the template and select the folder to place information technology in. If you put your template in a private binder, only you lot will be able to use it in the future. If this is a template that all users volition need access to, y'all want to brand certain y'all bank check the box "Available for use." Press save and become ready to customize your template.
Pace three: Writing and Merge Fields
On the next page, you volition create your Salesforce archetype email template. Drop-down menus allow you to select the object and fields to merge. Merging in custom fields tin personalize the email based on your organization and your customers. For example, create a salutation and merge a custom field with the customer's offset and last proper noun. You can practice the same at the cease of your e-mail and add a merge field with a specific proper name to be included.
For the merged fields to execute flawlessly, the data needs to be fully populated in the customer's Salesforce record.
Step 4: Text Version
When you are happy with the template, you can click next to create a plain text version. Almost people have an email client that tin read custom HTML, just not all. Past creating a obviously text version available, you can often increment your chances that the email goes to their inbox instead of a SPAM folder. Simply non to worry, your recipients will merely get one version of the email.
Stride v: Exam
It's a great idea to send a test to make certain you've ready everything up correctly. If y'all notice anything has populated incorrectly, you can get back and edit your HTML code and text email templates to your liking. If you are familiar with Workflow Rules and triggers, you tin set the Email Template to send based on an outcome automatically, such as when a payment fails.
Step half-dozen: Attach a file
If you have a file that you'd similar to attach to your Archetype Email Template, that's possible also! Navigate to your folder of e-mail templates and select an electronic mail. Click the Attach File button and select the file yous wish to adhere to your template. Printing Relieve and you're washed.
Salesforce Lightning Email Templates
Now that you empathise how to create Classic Email Templates let'due south take a look at Salesforce Lightning Templates.
The Lightning templates are similar; however, they are currently just used as "one off" templates. That means that you cannot automate them similar the Classic Email Templates.
Salesforce has plans to allow automation in the future, but y'all can use them to send emails to individual recipients for at present.
Stride 1: Load a Record
To start a Lightning Email Template, navigate to a record that contains Salesforce Activities. This volition often be the Contact or Example record.
Step 2: Create the Template
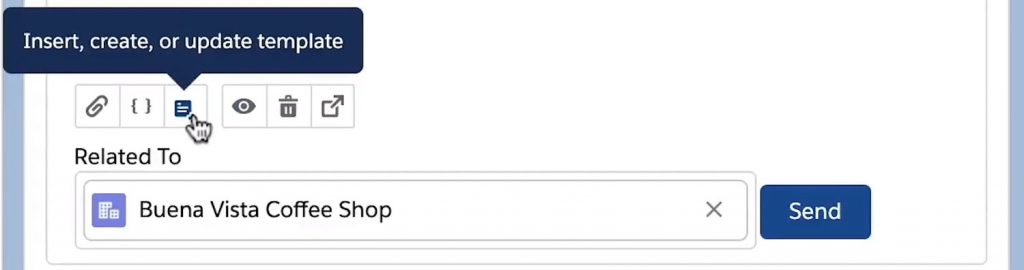
Click the Email button. Instead of typing out a new email, click the Insert, Create, or Update Template push button and select Create a Template.
Use the editing tool the same as you would to any E-mail client and customize the fields. You can add a subject line, include images, create hyperlinks and bullets if needed.
You volition see the brackets icon in the lower set of electronic mail tools, which allows you to add merge fields. Merge fields tin be whatsoever standard or custom field and help personalize the email by inserting field values from an already populated record.
You can attach files to your email hither as well.
Step 3: Salvage
When you are done creating your template, click the icon to the right of the brackets to salve your template.
Step 4: Use the Template
To use the template in the future, navigate to your Contact or Case record and click the Electronic mail push button. Instead of typing out a new e-mail, click the Insert, Create, or Update Template push button and select Insert a Template. You lot can now cull the template y'all created and use information technology for the electronic mail activity. Press send, and you're done!
Automate Payment Emails with Chargent
Using customized e-mail templates will be so helpful to your team. With the Chargent app for Salesforce, y'all can automate customized emails to your customers based on different triggers. Chargent's Payment Request email template will give you the ability to send a payment link directly to your customers over email.
Chargent makes sending invoices and receiving payments easier than ever, and you'll dear the results. Contact us today to integrate our pinnacle-rated payment processing app with your Salesforce workflow.
Share This Information
Hear From Our Customers:
The app works well for accepting payments and setting up recurring monthly payments for our clients. Peachy technical back up! Fast response (was within an hour) and corresponded with me regularly until the outcome was resolved (even though the issue was on my cease…oops). Very happy to know I will get assistance when I accomplish out.
Chargent makes automating our monthly donor payments a snap. Pinnacle-notch, extremely responsive service. Cheers!
Chargent is a reliable app with an excellent back up team. The setup is easy, the documentation is very comprehensive and our end users find it elementary to apply. Their support squad is knowledgeable and very responsive to our needs over the years.
Being a rookie in charging transactions through Salesforce, Chargent was able to assistance automate the whole process and deliver nothing but smashing functionality to our business organization.
Seamless integration with Salesforce. Covers all ordinarily required functions/features. Relatively cheap. Amazingly quick customer service with cracking follow-up.
Later moving to Salesforce, our Finance staff has been able to brand good utilise of the Chargent features as we have learned well-nigh how they might be used for our company and customers. We are still fairly new in our transition to Salesforce from our previous platform, merely the documentation from Chargent has been thorough.
Chargent works really well and can exist configured lots of different ways to fit your business needs. I've implemented the production on a few different projects with a variety of requirements and the package is very smooth. The Chargent Support team is as well ane of the best I've e'er worked with.
Chargent offers a bunch of useful features for our org! They accept made the lives of our acquirement staff a lot easier. Their client support really wants yous to succeed and are always available to reply tickets in a timely fashion. Keep up the nifty work.
Chargent is the fashion to go for payment processing. We have used Chargent for our payment processing needs. We like that it is integrated with the Salesforce platform.
Our company uses Chargent for processing payments and sending payments inside Salesforce. We recently re-branded and needed to update our logo on the payment asking link. Chargent was quick to reply via email with instructions and then even scheduled a remote login session to ensure the update was fabricated correctly.
Chargent has been central in the transformation of how we collect money from our clients and meliorate handle business. The customer service has been to a higher place and beyond. Highly recommend Chargent!
Chargent has been super easy to use for u.s. and their customer back up is excellent. They are always very quick to respond and help solve bug (if any). Highly recommend them!
Every bit someone without a technical groundwork making sure our payment platform is working well has been intimidating. The Chargent team has been so supportive and has truly gone above and across to ensure nosotros are getting what we need out of the product. Thank you lot!
We use Chargent to manage all of our sustaining memberships and for sending out payment requests. Makes it then much easier for people to pay their invoices. It is also such an easy tool to go set up and running!
We accept integrated Chargent and Accounting Seed into our sales and product processes and both work very well. Very nice to non have to get out the platform to perform our transactions. We may extend the solution into our due east-commerce operations every bit well. Nosotros have likewise received cracking back up when we needed guidance on implementation.
If you demand a great credit bill of fare processor app you've come up to the right place. Great support system, clear implementation docs, attentive team, a winning recipe for any Salesforce Org. I needed to add a characteristic that was missed months afterward implementation and with no problem the team clearly dictated what was required and even helped with the QA.
We've been using Chargent for most ii years now. It's a very easy product to apply and nosotros beloved the style information technology is integrated with our Salesforce arrangement. Whenever we have questions or demand any kind of assist, Stacey is correct on top of it for us. Quick response and thorough instructions.
We are just starting with Chargent, merely what we have seen and then far is amazing. It solved a lot of the bug nosotros had on our payment processing. Much more efficient! Tech back up has been awesome too. Chadd has walked us through the whole process without skipping a trounce. A large thank you to him and Chargent.
Great production with new features existence continuously added. Keen back up squad who resolve questions promptly. Special thanks to Chadd for e'er clarifying any questions and helping united states of america with production features!
I'm a consultant in the Entertainment infinite and my clients are e'er looking for a quick/like shooting fish in a barrel way to leverage their existing payment processing provider within Salesforce. I recommend Chargent every single time. The solution is flexible and allows for a great deal of customization.
We have received timely and helpful support from Randi. We are happy with the support we receive and the recommendations we receive to meliorate our processes.
The Chargent product has streamlined our process for credit cards. Our customers and sales team find it easy to tokenize our credit bill of fare payments. Whatever questions are answered quickly by the customer back up team. Chargent was the right partner for my visitor.
Stacey has gone above and beyond with helping me implement some new software features! Fifty-fifty when the project hitting a few speed bumps, she was always at that place to assist brand it as shine every bit possible. Based on the stellar customer support that she provided, I highly recommend!
Great Product. Lots of documentation and videos make things easier to learn and configure. I similar the flexibility of Chargent Payments, and the ease of employ. Data model is simple and straightforward. Splendid support team. 1 tip: When you lot contact for technical support make certain to grant SF admission for Chargent to go far fast.
My company utilizes Chargent features for payment solutions. Works seamless and they have excellent customer support where most queries are resolved inside 24 hours. Easy to install, easy to customize and comes with pre-built integrations to many payment gateways. Highly recommend Chargent for your org.
Great extension, Randi is cracking customer service, simple, straightforward, and user end friendly. FYI, I have been a client for five years.
Thank you and then much for going above and beyond in providing support for us. Y'all were very knowledgeable regarding the issues we encountered. You were extremely fast in responding and helping united states find a solution for our problems. It is swell to accept this kind of experience and interaction with such a positive person. THANK You lot!
Client Support responded quickly and solved my trouble in a timely manner. Crawly service!
Setup is easy with their comprehensive guide. Working on it for a year and and so far never received any bug. The cherry on the cake is their knowledgeable back up agents, they know what they are talking nigh and provide the best possible solutions/answers swiftly.
My maiden voyage implementing Chargent for a rather nuanced use case left me quite impressed! I am using the Orders parcel, and I constitute the User Interface very straightforward, the API well documented and the operation of the package very reliable, whether it be for one-time payments or recurring. The wide variety of gateway options seem to propose it's accessible and realistic for a wide multifariousness of users.
I had several issues that came up, because of our customization of the app, and got in bear upon with Chadd in Customer Support. He helped me with my initial upshot, and and so when another 1 came up later, as we connected customization, I reached out to him straight and he got right back to me. This is some of the best customer support I've experienced from a visitor!
These folks are extremely patient even with newbies with insane questions
Am sure those in the know would benefit a lot more with Chargent and its support team!
Chargent has been vital for capturing and charging payments in Salesforce for our visitor. Our sales reps use the Payment Asking feature for the client to enter their credit card information. Swell for PCI compliance. We accept the majority of our accounts using information technology and are working to go them on recurring payments.
We are probably one of the largest users of the Chargent product and have been delighted with the product and support. Strongly recommend this product to others who are looking for a method to have payments through their Salesforce integration.
In my experience, Chargent provides authentic and timely support. The system is well documented and new features are being added regularly. Highly recommend.
I've configured Chargent in Salesforce multiple times, also as using it in Form Associates. It'southward a great payment processing tool! The back up team over at Chargent is very responsive, and they make certain to do their best at resolving any issues I have. Each time I contact them I go fast, friendly service. I would definitely recommend using Chargent!
My client was in search of a Credit Card Chip Reader solution as they were migrating off of onetime carte swipers and their current payment product. In doing inquiry, Chargent Terminal seemed to be a great fit. The whole procedure of implementation from cradle to grave was seamless and unproblematic. My clients said that Chargent is far more intuitive and has fabricated their lives in processing payments extremely unproblematic.
Chargent is a slap-up payment processing solution! Nosotros've been using the app for a piddling over a year now and our finish users love the simple power to transport payment links to clients. Equally an admin, it'south easy for me to add together gateways when nosotros open up new locations.
The support team has been extremely helpful both from a support perspective and have also provided consulting back up which went above and across their purview. Our visitor had a number of choices to choose from a middleware omnichannel, but Chargent blows its competitors out of the water with both the vastness of their gateway library and terminal support.
As a seasoned dusty old accountant I can say personally that Chargent is Great. I can have as much detailed information equally I want or demand for accurate financial reporting. I tin set it upwards to present information technology to me in exactly the form I want that is useful for full general ledger accounting and sales forecasting/budgeting. Chargent makes making coin more enjoyable equally if that were a affair.
We've used Chargent since our Salesforce implementation and it has made the AR process easy for u.s.. The customer support is excellent and very helpful with whatever questions or issues.
Nosotros chose Chargent and Chargent Pay Anywhere to handle all payment related processing for our Salesforce Implementation. The apps have worked perfectly for our implementation. The documentation is well written and electric current. 1 other bonus to Chargent is the vast number of Payment gateway and card processing companies. This lone saved u.s.a. time and money by using our existing payment processor.
Chargent is piece of cake to ready upwards and there are many gateways y'all can cull to integrate. Their back up is very responsive and easy to work with.
Customer service has been boggling! They are willing to leap on calls with you equally needed, and are ever responsive. The functionality that Chargent provides allows us to automate a lot of the mundane aspects of billing.
Nosotros've been using Chargent for over 2 years now, and information technology has greatly met our needs. The most impressive part is the customer service. I've had same day solutions every fourth dimension there has been an issue. Thanks!
Had some problems with our Chargent Terminal and when I reached out to Customer support and they were very responsive and got us a solution right away! Very impressed with the response time and the motorcar they have provided.
Non beingness a developer, I was somewhat apprehensive about committing to this product. But with a support partner similar Stacey, wow. Onboarding the product was a cakewalk, and information technology's no frills point and click was easy to railroad train our reps. High fives all effectually!!
I'one thousand new to the Salesforce globe and it's implementation at our visitor. I needed help with setting up a couple new environments. Chargent helped me set it upwardly (I missed a footstep) and they sent me documentation after the fact to solidify the learning. Other companies just ship the doc and y'all hope you can effigy it out.
Neat app that allows u.s.a. to connect custom contract to payments! Back up team was incredibly helpful in preparing for the necessary upgrades for time to come Salesforce releases.
Chargent is easy to apply, piece of cake to train, and highly functional/user friendly. In addition, the back up team is very responsive, and their aid manufactures are intuitive and piece of cake to learn. Very satisfied w/ this plugin every bit a payment collection solution.
Fantastic product. We beloved this app! Ease of employ, nifty user experience and interface, and the customer service is exceptional! Highly recommend.
Chargent does exactly what we demand it to, and was super easy to ready and customize. Their set upward resource are very helpful, and their customer back up is also very responsive and eager to aid. Overall, our experience has been very positive!
This app provides a uncomplicated and notwithstanding most comprehensive mode to manage payments from a Salesforce Org. Since unlike payment options are supported (1 fourth dimension, recurring, etc) this app has applications within different industries and sales model.
This solution did everything that nosotros hoped it would. The support team was also extremely helpful through gear up up and become live. Highly recommend.
This is a great App. Like shooting fish in a barrel to utilize. Like shooting fish in a barrel to fit in anywhere. The great people at AppFrontier are friendly and helpful.
Solutions Architect here, at first I was weary of trying to curve Chargent outside what I perceived to be its focus on standard salesforce architecture, simply came to discover that with some clever structuring, you can become this app to work nether nigh any set up of circumstances. I'm impressed, and their support is very timely.
Give thanks you so much for going in a higher place and across in providing support for us. You were very knowledgeable regarding the issues we encountered. You were extremely fast in responding and helping us notice a solution for our issues. It is great to have this kind of experience and interaction with such a positive person. Thanks!
Chargent was simple to implement and great for Accounts Receivable at every stage of our business.
After submitting a support ticket I received response and possible solutions to my issue within the same day. Randi was very helpful and resourceful- she took the fourth dimension to call and explicate what was happening, really appreciate her help!
We take always had a great experience with Chargent. I have had the pleasance of working with Randi who has been helpful for all of our needs. We e'er become the support to walk us through and the willingness to schedule a meeting if needed
Chargent is very piece of cake to install and use and they have a great documentation library. Likewise, their customer service support is amazing. Robert and the squad are always very helpful and knowledgeable.
Equally part of our migration we had to set upwards everything in our new org. Robert from Chargent provided excellent back up and helped us with all the set up upwards and features that are available. Through his suggestions we have implemented the automations to collect the recurring payments and handle declines.
We were able to get Chargent upwards and running within only a couple of weeks using basic functionality, and quickly expanded to use the recurring billing feature to provide our patients payment plans. With the latest release and automated collections, nosotros are able to let our patients to update their billing information online, with minimal development on our side.
First-class for all types of payments. Nosotros've been running recurring and one time billing through Chargent for at to the lowest degree the last five years. They have frequent updates to keep the states compliant and in that location are virtually never any issues with payments. Even better is their support squad.
The latest update, Chargent 6.0, was a breeze to install. Though out of the box non all features are automated, with a little bit of process builder you volition accept auto-filled fields in no time. We accept taken Chargent to a very highly custom payment processor for our users.
We recently had many problems connecting the Chargent App to our Depository financial institution. The Support was incredible Chadd was an absolute hero who just kept digging until the problem was found. (which was nothing to do with Chargent I might add). I wholeheartedly recommend both the App and the support we have had as well.
I'thou supporting an existing implementation of Chargent. As I've come to speed I've been very impressed by their excellent customer back up.
High value product that is both flexible and efficient. Whenever we ran into any errors due to our Customs Setup/Configuration, the support squad was quick to reply and resolve our bug. Thank you!
This is a great app that helps simplify receiving payments from most pop payment gateways and recording everything in Salesforce. I'g a consultant and set up this up for a client who had a very custom requirement. Chargent support was very helpful in guiding me on the configuration.
Easy install – quick client service. Very easy to install and get running. Like shooting fish in a barrel for users and for admins. We had one spot of confusion during our initial sandbox testing. Support was quick to respond and got us on our mode.
I had the opportunity to work with Randi Armour, and she was very helpful and responsive. I had several video calls with her, where she took the time to piece of work with me to solve and troubleshoot issues. 100% bang-up customer service.
Product is great and easy to configure. Support and Customer Service is brilliant. Stacey was quick to leap on a call to resolve the issue. She is very patient and she responds in a very timely manner. Highly recommended.
We have a fairly customized donor checkout process for our nonprofit organisation, and after a year struggling with another gateway, nosotros implemented Chargent and haven't looked back! Integration was simple and well-supported both past documentation and staff time, and their ongoing support is stellar–super fast responses and always eager to assist.
Customer service has been wonderful! Stacey is e'er willing to bound on calls with us as needed, and is e'er responsive. I would highly recommend this service.
We have been happily using Chargent for almost 2 years and I tin can tell y'all it is such a wonderful investment. Nosotros have saved time & money having automatic payments candy. Now with the 6.0 version we are realizing all of the other great benefits at that place are.
We take implemented Chargent with multiple clients and betwixt their app functionality, strong (and super responsive) support team, and the customization of the Salesforce platform — it makes for a great partnership! Multiple payment gateways, payment types, and 1 time / scheduled / recurring payments gives us a lot of flexibility when looking to develop processes within Salesforce.
We have had few issues with Chargent, and someday nosotros have, the customer service has been then helpful and quick to respond! A big bonus, you really get to talk to a live person!
We've been using Chargent for several years with swell results. With the recent modify to some security features, I had to request assist to keep the product working smoothly. Chadd and Stacey were astonishing to piece of work with. Both followed up to brand sure things went well (and didn't show whatever exasperation with me and my lack of tech knowledge and power :)).
Chargent is a great way to easily have payment from customers, either in person, or via email. Support is also helpful and quick to assistance solution.
I implemented Chargent for an end customer because of the limitations on the current app that they were using. The Chargent APIs are super simple, the support staff was great and very responsive. We found a dandy partner in Chargent. The simplicity in setting up multiple gateways and recurring billing configuration options are second to none if you want the become past clicks not code mantra.
With Robert'south help my customer was able to convert sales to cash and utilize partial payment and recurring payment settings. With Chargent and DBSync integrations, my client is able to integrate QuickBooks Enterprise to tape invoices, payments and estimates for progress billing. I highly recommend this integration.
Chargent has a pocket-size squad simply was always quick to respond to my emails. They were besides able to leap on calls and meetings to make sure everything was working correctly. Excellent customer support.
Nosotros are probably one of the largest users of the Chargent production and have been delighted with the production and back up. Strongly recommend this product to others who are looking for a method to accept payments through their Salesforce integration.
Chargent Anywhere works like a charm. It gives us all the flexibility nosotros want and is very easy to use. Whenever I've had questions, they answer apace with the knowledge to assist me on the spot. What more could I inquire for? I highly recommend!
We had a recurring payment issue come upwards that needed to be resolved as rapidly as possible and when I reached out to Chargent I got a response dorsum within about an hour! Within a few email exchanges, she was able to aid u.s.a. become back on track and our recurring payments were working again.
Chargent is a game changer and takes the heavy elevator off payment collections, and gives customers peace of mind and ease. Their support services are always top notch and super willing to observe a solution.
Dearest this tool! Information technology has saved our team hours of potential development work. It took minutes to connect up our payment gateway and become a proof of concept running. The support team was fast to respond, happy to jump on the telephone, and personally investigated an issue we were having – all within a few hours.
This app provides a great and piece of cake way to collect payment, streamlining our sales process. The back up staff is fantastic and resolves issues correct away!
We employ Chargent in our SF Enterprise org. It's a pretty powerful tool with lots of customizability. You lot tin integrate with pretty much whatsoever gateway. Client support is quick to respond also and very knowledgeable. And is as well willing to do a screenshare to walk you lot through whatever issues you might have.
We've been using Chargent to integrate our Payment Gateway for most 3 years. It is stable and undecayed. Information technology's especially important to note when I faced a trouble caused by a change to other parts or our org, they were amazingly responsive in assisting to solve the problem.
I recently had a few Chargent set up and billing questions. I was able to email Chargent and they responded right away. The developer was able to expect into how our individual salesforce instance uses Chargent and answer my questions. The representative was and then able to piece of work with me to answer my billing questions.
Chargent's customer service has set the bar high. They have a team of skilled and knowledgeable professionals that makes working with their app a breeze. I feel confident that whatsoever time I have a question or concern that they will be there to help me through it. This is a huge factor in any working relationship.
I am and then stoked for our teams to be able to have the ease of utilizing one platform for all their needs! Chargent makes information technology incredibly easy to manage every attribute of recurring billing. We've needed help through our setup and communities integration, and their support has been extremely responsive and understanding of our urgency.
We are using Chargent in Salesforce to collect payments electronically, and nosotros have too integrated Chargent and Salesforce to Quickbooks to completely automate our billing processes and accounting records. The Chargent Back up Team is always very helpful and friendly.
Chargent Support is simply the best I have always worked with. I just cannot speak highly enough of the support that Chargent provides both from a technical aspect and from the account management perspective. At that place are existent people on the other side of the telephone and electronic mail. The app works great and nosotros feel it is a great value as well.
This is a great app that helps simplify receiving payments from about popular payment gateways and recording everything in Salesforce. I'thousand a consultant and set this up for a client who had a very custom requirement. Chargent back up was very helpful in guiding me on the configuration.
Everyone at Chargent has been great to deal with during our implementation. Product is well documented and our implementation team has nothing but skillful things to say.
Chargent was amazingly helpful during our decision process on a payment service for SF. Extremely personal customer service helped united states rapidly sympathize the capability of Chargent and see that this is the right solution for 100% native Salesforce payment processing.
We've recently started using Chargent and information technology works neat. There are a lot of features bachelor and the back up team is really willing to piece of work with you to make sure you are setup properly, thank you Stacey!
I recently reached out to Chargent support for help. The response was very timely and the directions were direct. They got me back up and running in no time. Thank you lot Stacey for your support!
I have implemented this product for ane of our client's salesforce org and the functionality information technology provides is elevation notch. Easy to utilize for the sales reps and setup is very straightforward.
It just works. We utilise Chargent for all of our land registration transactions at DIR and it works very well without worry. Would recommend to anybody. A++
Chargent has simplified our billing needs substantially. We are able to charge hundreds of customers with ease while receiving timely back up by the Chargent team whenever it is needed. Very satisfied!
The Chargent customer service team is outstanding! They are very responsive, knowledgeable, and they offer to get above and beyond to aid solve issues including offering to collaborate with our programmer to solve bug that might ascend. I highly recommend Chargent.
The documentation provided was very detailed in understanding the behaviour from a support signal of view for the customer. I personally dealt with Stacey who has been an amazing help with dealing with any questions I've raised and alleviating any of my uncertainties. Great product & support!
My experience with Chargent has been cracking from start to showtime. The installation and configuration procedure is as like shooting fish in a barrel as information technology tin can get when you lot recall well-nigh payment processing. Chargent comes with total set up upwards out of the box and the flexibility to brand it your own is laudable.
When our incompetent SF implementation partner dropped the ball, Chargent support was able to login to our account, place the issue, and have information technology resolved in less than 24 hours and then we had almost no reanimation in processing payments. Excellent job!
The tech was offering solutions and fifty-fifty went above the normal support and executed very apace!
Non only does Chargent reduce an enormous corporeality of authoritative burden information technology saves time and brings all your payment needs nether your Salesforce hood. With the ability to utilize Chargent Anywhere, your problems of object-limits for payments take come to an end. Well worth the money and ROI will be almost immediate for you.
They have smashing documentation including written and video content. And when you are in doubt you can open a case with the back up team hands, and they respond quickly with detailed and relevant information. No inefficient qualification steps.
Chadd from AppFrontier LLC made it happen in one hour! He helped the states to set up a gateway for Chargent in SalesForce, he did the troubleshooting, found out the result, contacted the third party and stock-still information technology! Thanks Chadd!
I've actually enjoyed using Chargent and the features information technology enables and allows. My account representative is always quick to respond and help with any questions I accept or offering aid when I demand it. Chargent integrates hands with Salesforce workflows and allows for ease of use.
Nosotros've been with Chargent for a few years and cannot say plenty virtually how responsive their support team is to our requests. Fifty-fifty if information technology'southward something incredibly elementary such as 'what is this field used for?', I typically receive an e-mail response within an hour, with connected follow up later to make certain all other questions have been addressed.
It was really easy to get everything fix thank you to the instructions and knowledgebase. When I did have problems, their support squad was quick to answer and resolve the effect.
Stacey went higher up and beyond to help me troubleshoot and answered all of my questions. When she needed to dig in a little farther, she did and so and got back to me with the solution very speedily. When payment processing hits a snag, aid to remedy the problem is imperative and Stacey and Chargent provided both.
This product is excellent and and then are the whole team at Chargent. I have had nothing simply nifty service and functionality since we started using their production. If you're undecided on a solution right at present, you tin can finish worrying. You've found your Answer!
The back up squad is great. Stacey has answered all of my questions apace and effectively which is a huge relief when transitioning into a new CRM every bit a company.
We were able to easily implement Chargent into our Salesforce org. It does everything we needed information technology for! Our accounting department loves it! The customer service is fantastic equally well. I highly recommend Chargent!
Customer service is timely and beneficial. A representative responded to my notation within minutes and followed up to ensure my issue was solved.
Chargent has been an integral part of our order processing and has been a solid product for our needs. Further, the squad is solutions based and has spent significant time working with us on our needs and how they can back up. Bully product and great team.
We use Chargent in our SF Enterprise org. It's a pretty powerful tool with lots of customizability. You tin integrate with pretty much any gateway. Client support is quick to respond likewise and very knowledgeable. And is likewise willing to do a screenshare to walk you through any issues you might have.
Not being a developer, I was somewhat apprehensive about committing to this product. But with a support partner like Stacey, wow. Onboarding the production was a breeze, and its no frills point and click was like shooting fish in a barrel to railroad train our reps. High fives all around!!
The production is easy to utilize, it was easy to setup, and the support staff was great. Very quick to respond and gave very helpful and detailed feedback. I besides think their documentation is very thorough! Great feel with them.
Very pleased with the functionality of Chargent as well as the quality of their client support. Submitted a help ticket every bit our payment form needed updating. Their client support responded very chop-chop and gave me personalized, specific instructions on how to update our form. Would recommend!
I am very pleased with the support I receive for Chargent. I have implemented it for several clients and I always take questions regarding each use example. The back up team is very knowledgeable and helpful!
I came into ownership of this tool without being a part of the initial requirements gathering or setup, so there was a slightly steep learning curve involved, given the circumstances. I've at present been involved with the rollout of new Chargent gateways, setup payment processing and deployed new Chargent features to our users – and support has been top notch since!
I used the trial to configure this and even and then, their support was fantabulous. Very helpful both earlier and after getting the full version. We've recently upgraded to the eye tier (Platform Edition) and look forward to working with Chargent going forward! 5 stars!
I joined a visitor that was already using Chargent as the payment processing system inside SF. Information technology was a quick report and piece of cake to understand the inner workings of the tool. What was even better is you lot get local service and prompt replies when y'all have questions.
Best Salesforce App I take Ever Used. Simply put, Chargent payment processing with Salesforce has been fantastic. I run hundreds of transactions a day, and after trying another available apps, this was a life-saver. Recommend highly to any size business.
We've been using this app for about 3 years. The support is amazing and actually knows their system and how to connect with SF. Stacey has been super helpful and has been my support person since nosotros started using this app.
Chargent does exactly what we demand information technology to, and was super easy to set upwards and customize. Their set up resource are very helpful, and their customer support is likewise very responsive and eager to assist. Overall, our feel has been very positive!
I had a faulty screen on my Chargent terminal and the support team was platonic. To save me time, the support squad worked with the technical team for me and all I provided was what problem I was experiencing. And so they sent out a replacement last within 2 days with the return box and label. No hassle then I could continue doing my work seamlessly.
I noticed an issue in our Chargent order organisation and thought I would email Chargent. I got an immediate response that worked instantly. Not only was the e-mail back helpful they also attached a link to the FAQ related to this issue and it was well explained. Overall the immediate and useful help was much appreciated and I look frontward to working with Chargent in the future.
Chargent is an invaluable application for us to manage our payment gateway for product orders. They supported u.s. through the recent Salesforce security changes which was incredibly helpful!
Chargent is extremely reliable and continues to be flexible for all of our custom salesforce development. I will continue to recommend them to all of our partners.
Very responsive and helpful. Set up a coming together to guide me through the process.
I have been working with Chargent for iii years. I love the product merely love the support even more than. They are very responsive and ever willing to go higher up and across to solve a problem.
I am the Salesforce Admin for our visitor. We have a very frail environment and way too much customization. Our business required a solution that is not out of the box Chargent. The support and quick response I have received is in a higher place and beyond what is expected.
A cracking payment solution native to Salesforce which makes it like shooting fish in a barrel to build automations off of. Production team continues to impress with new releases!
Working in the Accounting Role with the new engineering science we have implemented over the last year has been a challenge to say the least. Brett, our Sales rep has been there with u.s. from the commencement, highly knowledgeable and patient. If you are looking for a payment solution that can exist customized with plenty of options Chargent is the answer!
I had a faulty screen on my Chargent terminal and the support team was platonic. To save me time, the support team worked with the technical team for me and all I provided was what problem I was experiencing. Then they sent out a replacement final within 2 days with the return box and label. No hassle so I could continue doing my work seamlessly.
We accept been using Chargent for over 3 years to process CC in the field & office, and are extremely satisfied with the app, the features and the response fourth dimension from support team. Highly recommended.
Chargent has been super easy to employ for us and their customer support is first-class. They are always very quick to respond and assist solve issues (if any). Highly recommend them!
We have been using Chargent as our main payment app since Nov 2019 and have had zero issues with the product. Out of the box, Chargent fit 90% of our needs. Fifty-fifty onboarding was easy, within a few orders our staff was comfortable using this software.
Stacey saved our It department by answering our support question in a prompt and easy to empathise manner. I have never experienced such a quick plow around on helping to resolve our issue. Nosotros look frontwards to implementing all of the customizable features that Chargent has for our org! Keep up the great work!
Very pleased with the functionality of Chargent as well as the quality of their client support. Submitted a help ticket as our payment form needed updating. Their customer back up responded very quickly and gave me personalized, specific instructions on how to update our form. Would recommend!
I love how Chargent can work on any object in Salesforce and all of the dissimilar ways to pay. Their client support and documentation are wonderful too!
We've merely started using Chargent and Salesforce this past month. We've found Chargent to be easy to use, helpful in retaining credit cards on file securely and the staff is very responsive. All of the items nosotros wanted to use Chargent for nosotros've been able to execute with very little transition.
I'one thousand a SF Admin recently charged with preparing for the June 20′ release. I am extremely grateful for the support team at Chargent. I am very impressed with the thoroughness of monitoring their production with SF and the proactive arroyo to keeping ahead of the releases. Thank you Chargent!
Nosotros came across Chargent during our Salesforce implementation. We were having lots of issues with online payments. Chargent solved all our issues in an case. Highly recommend this production for higher education institutes, peculiarly TargetX CRM users.
Their customer support team is neat and very responsive. Even just for simple clarification, they not only reply in no time, simply also provide links to add more clarity.
I just installed Chargent yesterday and had to stop in the middle of the setup. When I was able to get dorsum to it today, my auto-fill on chrome wouldn't allow me to complete the setup. I called the support number, someone answered right away and answered and walked me through the setup, fixed my issue. I was back at work within 10 minutes, if that!
We have received overwhelming support from Robert Ruelas on the Chargent/Accounting Seed integration. Robert stayed with us on our problem until resolved. We don't find this level of support often and would recommend the Chargent App for any organization that handles credit cards when y'all are using Salesforce and/or Accounting Seed.
We're using Chargent and it is astonishing, we struggle with something simply their support was incredible, they walked us through the process and it was very helpful. Lesser line, even though I'thou not a Techy guy, Chargent's support is very helpful.
Chargent is already fairly like shooting fish in a barrel to use, just I somehow managed to confuse myself on distributing licenses to my users. The customer service responded to me so promptly, and in clear and concise language helped me resolve my upshot.
Chargent has been cardinal in the transformation of how we collect coin from our clients and better handle business concern. The customer service has been in a higher place and across. Highly recommend Chargent!
Nosotros love that Chargent is entirely native to Salesforce and allows for a lot of customizations, such as complete control over electronic mail templates, invoices, receipts, etc. Information technology makes it much easier in a heavily regulated field, Fiscal Services. The support quality alone is enough for me to fully endorse this company.
Working with Chargent Tech Support has been nifty. Stacey has been very helpful, and supportive every fourth dimension we have whatsoever questions or need to upgrade our Chargent app. The Chargent Tech support squad responds in a timely mode every time I take any questions. Thank y'all Stacey and Chargent Support team.
Nosotros've been using Chargent for over 2 years now, and it has greatly met our needs. The most impressive part is the customer service. I've had same day solutions every time there has been an result. Thank y'all!
Nosotros are using Chargent for handling payment processing. On one click of "Send Pay Request" we can send an electronic mail and customer tin can pay hands just with a link. Customer support team is quick in response and prepare to assist. I similar how Chargent stay ahead and helps update Chargent app according to Salesforce new releases.
Chargent is extremely valuable for our company to be able to come across transactions on customers inside Salesforce. We're able to provide quick and accurate service without having to login to our outside processor.
Chargent has been super helpful with our migration from our old CRM into Salesforce. Using Chargent we were able to have our dev team create custom built gild forms around the Chargent app that enabled u.s. to charge and set up recurring subscriptions with ease.
I have been using Chargent in my current office as a Sales Ops Manager. I had an issue a few weeks ago where nosotros had a bunch of double payments come out of client accounts – naturally this could have been a disaster. Merely because of their amazing support, I was able to resolve the issues speedily, effectively and without too much hassle from clients.
Nosotros've been using Chargent for about 5 years now & credit carte processing has been seamless. Occasionally issues arise, but their tech support is very responsive. I just worked with back up to upgrade our version of Chargent to prepare for the next SF upgrade & the support process was smooth.
We've been using Chargent for about 5 years at present & credit carte processing has been seamless. Occasionally problems arise, but their tech back up is very responsive. I just worked with support to upgrade our version of Chargent to fix for the next SF upgrade & the support process was smooth.
Chargent has a fantastic product and excellent support. The tools are easy to use, the documentation is very clear and addresses most issues we institute. Their back up filled in the gaps of data that the documentation didn't quite cover.
We are successfully tokenizing credit cards, sending payment links, and processing credit cards for multiple payment gateways and companies. Setup was piece of cake and tech support was very responsive when needed. Chargent was exactly what our company needed to capture payments via Salesforce. Thanks to the flexibility and security features of Chargent, we accept been able to reduce our credit card processing fees past close to 2%.
Easy product to piece of work with with adequate documentation. Back up team is FANTASTIC. Very responsive and understand what you're request, fifty-fifty if information technology slants to the technical side.
I recently worked with Stacey to aid fix new Gateways for our company. We were experiencing an error that turned out to be unrelated to Chargent, and she still got on a Zoom call to aid troubleshoot and provide guidance. 5/five stars!
When it comes to wiring up a payment solution in Salesforce, this is the best tool I have constitute. I've implemented it on a few projects at present – and I can say the tool works well and the customer service is infrequent.
Chargent's awarding has provided us the power to automate a payment process which usually took a person xv minutes to process, down to less than a minute with the Chargent integration. Treatment payments in the past volition no longer haunt us since nosotros are now PCI compliant, we know we tin can residual our client's minds by letting them know their information is secure.
Overall 5 stars. Quickly replaced a Poynt terminal and now back upward and running!
Very pleased with the response of the support team and Stacey in particular. It was great to get a response on a holiday and then we could continue our configuration and setup.
I've worked with multiple payment processors in-firm and otherwise including some of the larger systems. I've never seen recurring and one-fourth dimension payments made easier in my unabridged life. Not simply does this do what information technology says, information technology took ten minutes to set up and by cease of day 1 nosotros had a experience for how it worked across the company. Uncomplicated, straightforward, washed.
Customer service has been boggling! They are willing to bound on calls with you lot as needed, and are always very responsive.
Though y'all could easily run these processes using Chargent buttons and interfaces, the ease of automation-building with these objects allow admins and developers to take this functionality to some other level. Not to mention their sales and back up teams have been nothing but clear, responsive and helpful in all of my interactions with them. Highly recommend!
My company utilizes Chargent features for payment solutions. Works seamless and they have fantabulous customer support where about queries are resolved within 24 hours. Like shooting fish in a barrel to install, piece of cake to customize and comes with pre-congenital integrations to many payment gateways. Highly recommend Chargent for your org.
Helpful back up when we needed it. The support team at Chargent has been very helpful answering our questions. As a not-developer working to become it up and running, the support team was always available to answer our questions.
We have used Chargent for iii years and everything has been seamless from setup, to upgrades, to daily use. I highly recommend this app!
A fast and smart solution for solving a trouble. Manage orders and transaction… and perfect integration with Salesforce… and everything without any programming effort… and with a quick and professional technical back up. Our experience with this product and technical back up is amazing!
These folks do a great chore, take excellent cognition, and care about their customers. Truly capeesh their authentic service.
© 2012- All Rights Reserved AppFrontier LLC AppFrontier and Chargent are trademarks of AppFrontier LLC.
Salesforce, Salesforce.com, AppExchange, and others are trademarks of salesforce.com, inc. and are used here with permission


How To Delete Templates In Sales Force,
Source: https://appfrontier.com/blog/salesforce-email-templates
Posted by: dumaisention.blogspot.com
0 Response to "How To Delete Templates In Sales Force"
Post a Comment